Services
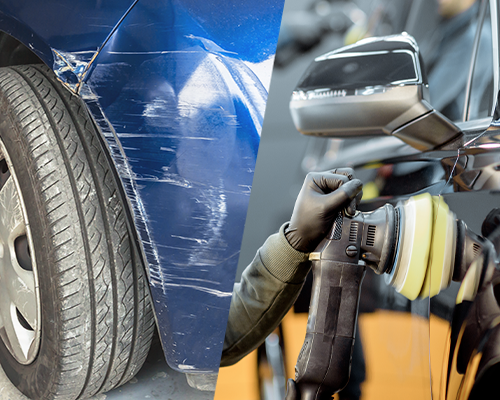
Denting and Painting
Repairing a car dent and painting it involves several detailed steps to ensure that the damage is properly fixed and the finish matches the rest of the vehicle. Here is a comprehensive guide to the process:
Tools and Materials Needed
- Sandpaper (various grits)
- Body filler (e.g., Bondo)
- Putty knife or spreader
- Masking tape and paper
- Primer
- Paint (base coat)
- Clear coat
- Spray gun or aerosol paint cans
- Rubbing compound
- Polishing compound
- Buffing pad
- Safety equipment (gloves, goggles, respirator mask)
- Dent puller (if necessary)
Process for Car Dent and Paint Repair
1. Safety Precautions
- Wear safety goggles, gloves, and a respirator mask.
- Work in a well-ventilated area to avoid inhaling fumes from paint and primer.
2. Assessing the Damage
- Examine the dent to determine its size, depth, and severity.
- Decide whether the dent can be repaired with basic tools or if it requires professional attention.
3. Preparing the Surface
- Clean the damaged area with soap and water, and then wipe it down with a wax and grease remover.
- Sand the area around the dent with 80-grit sandpaper to remove paint and create a rough surface for the body filler to adhere to.
4. Repairing the Dent
- Small Dents:
- Use a dent puller tool to pull out minor dents. Follow the tool’s instructions for use.
- Large Dents:
- If the dent is large or deep, you may need to use a hammer and dolly to gently tap out the dent from the inside.
- Use a body filler to fill in any remaining low spots. Mix the filler according to the manufacturer’s instructions and apply it with a putty knife or spreader, smoothing it over the dent.
5. Sanding the Filler
- Allow the body filler to dry completely.
- Sand the filled area with 80-grit sandpaper to shape it and then with 180-grit sandpaper to smooth it.
- Finish with 320-grit sandpaper to blend the edges into the surrounding paint.
6. Masking
- Use masking tape and paper to cover areas around the repair to protect them from overspray.
- Ensure the edges of the tape are firmly pressed down to prevent paint from seeping underneath.
7. Applying Primer
- Apply a coat of primer to the repaired area using a spray gun or aerosol primer. Hold the spray can or gun about 6-8 inches away from the surface and apply in light, even coats.
- Allow the primer to dry, then sand it lightly with 600-grit sandpaper to smooth it out.
- Wipe the area with a tack cloth to remove any dust.
8. Painting
- Shake the paint can or mix the paint according to the manufacturer’s instructions.
- Apply the base coat paint in thin, even layers, allowing each coat to dry according to the paint manufacturer’s instructions.
- Apply 2-3 coats, or until the repaired area is fully covered and matches the surrounding color.
9. Applying Clear Coat
- Once the base coat is dry, apply the clear coat in light, even layers. Hold the spray can or gun about 6-8 inches away from the surface.
- Apply 2-3 coats of clear coat, allowing each coat to dry thoroughly.
10. Buffing and Polishing
- Allow the clear coat to cure completely, which may take 24-48 hours.
- Use 1500-grit or 2000-grit sandpaper to wet sand the repaired area lightly to remove any imperfections.
- Apply a rubbing compound with a buffing pad to remove sanding marks and restore the shine.
- Follow with a polishing compound to enhance the gloss.
- Clean the area with a microfiber cloth.
Preventive Maintenance Tips
- Regularly wash and wax your car to protect the paint and clear coat from environmental damage.
- Address dents and scratches promptly to prevent rust and further damage.
- Use a car cover if possible to protect the vehicle from the elements.
By following these steps, you can repair dents and paint your vehicle to restore its appearance and protect it from further damage.